
Setting up PPP in Red Hat 5.0 to 5.2
You should already have your modem set up and working properly.
If you don't go here.
1. If you are already have X running skip to #5.
2. At the login: prompt, type in root and hit enter.
3. Type in the root password at the Password: prompt and hit
enter.
4. Your prompt should look something like [root@localhost root]:
If so, type startx and hit enter.
5. You should now be staring at a graphical windows setup, which by
default in Red Hat is the
AnotherLevel fvwm2 window manager configuration. Also,
when logged in as root, the
Control Panel should be displayed along with a terminal. If the
Control Panel is not running,
you can either select it from the Start button or type in control-panel
at
the prompt in the
terminal window. It should look like the following:

6. You can either click on the Network Configurator icon(the one with
the computer icons all connected)
or type netcfg at the prompt. If your first terminal is busy
with control-panel, open another terminal from
the start button. Just click on New shell.
7. You should now see the following:
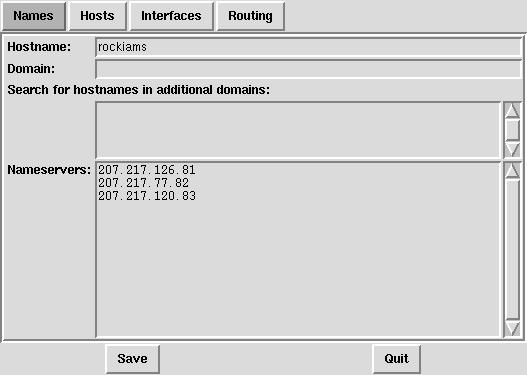
8. Actually, you should see localhost.localdomain in the Hostname: box
and there should be no entries in
the Nameservers: box. You are going to fix that now. Delete
the hostname and type in whatever you
want your computer's name to be. This is unimportant if you are
not on a network. Next enter the DNS
numbers that your ISP has listed. These are the correct numbers
for Earthlink as of February 21, 1999.
9. Now click on Interfaces. You should see the following:

10. Click on the Add button. You should now see:
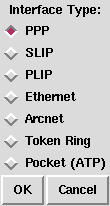
11. Make sure PPP is checked. Click on OK.
12. You should now see the following;
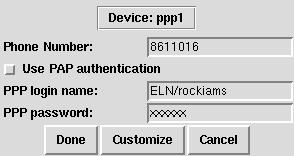
13. Add your local dial-up phone number, your ISP login name and password.
Click on Customize,
you should see the following:

14. Change the Line speed to match your modems speed. Change anything
else appropriate
to your situation. Click on done, you should see the following:
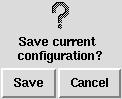
15. Click on Save.
16. You should now see the following:

17. The only difference you should see is you should have ppp0 instead
of ppp1. The reason is trivial.
Once the interface is highlighted, you can click on the Activate button
to connect to your ISP.
18. Once you have established a connection to your ISP, you can now
FTP, use your favorite browser,
or whatever. If you don't know where a browser lives on your
system, type whereis netscape at the
prompt and it should reply with something like /usr/local/bin/netscape/netscape.
You can type in that
exactly or you can type cd /usr/local/bin/netscape
and then
type ./netscape to start the version that
came with your distribution. There are easier ways to start Netscape,
which you will learn later.
19. Good luck and have fun with Linux!

|